

In this guide, I’ll show you how to add first-party cookie values client-side, which your server-side Google Tag Manager processes can then access.
You might be wondering: “Why bother?”. After all, if server-side GTM is running same-site with the website sending the requests, why can’t it just read the cookies on its own, right?
Well, true. But there are cases where the website and web server seem to be same-site but are in fact not. One such case is Shopify’s Checkout Extensibility.
If your Shopify checkout pages are running in this sandbox, then requests sent from the checkout page to a web server will not carry any cookies. Similarly, if you try to set cookies in the server response, it will not work either. Zooming in on the response, you’ll see a warning like this:

The yellow background (in Chrome DevTools) indicates that the cookie was treated as a third-party cookie.
If you check the info on the error, you’ll see that it recommends setting the
SameSiteattribute correctly to allow handling third-party cookies. This is NOT the solution. You do not want to deal with third-party cookies as this is not (technically) a cross-site setup.
So, if you want server-side Google Tag Manager to read first-party cookies for Google Ads and Meta Conversions API, you’re out of luck.
However, there is a way to sort this out, and that is to “fake” cookies by sending the cookie values in the client-side request.
Caveat: I’m not a Shopify user or a Shopify expert. I know there are other approaches, such as using the parent page to handle the tracking or by adding dedicated apps directly to Shopify. The advice in this article pertains to the situation where you want to use server-side Google Tag Manager for your ad tech needs.
X
The Simmer Newsletter
Subscribe to the Simmer newsletter to get the latest news and content from Simo Ahava into your email inbox!
How it works
Since the sandbox restriction only applies to network requests between the site and the web server, you still have access to cookies set with JavaScript on the website itself.
The solution is then to grab the cookie values client-side, attach them to the network request as event parameters, and then map or transform them server-side into a format that the vendor tags can read.

In the examples of this article, we’ll use the _gcl_aw and _fbc cookie values for the Google Ads click identifier and the Facebook click identifier, respectively.
The Google Ads Conversion tag in server-side Google Tag Manager reads the click identifier from either the URL (as the gclid parameter) or from the _gcl_aw cookie. Since we don’t have access to cookies in server-side GTM, we’ll need to manipulate the page URL to include the gclid by using a Transformation.
The Facebook Conversions API tag (we’re using the Stape template) has multiple ways of sourcing the click identifier. We’ll use a simple tag setting to attach it to the conversion events, and we’ll also make sure a Transformation removes the parameter from any other tag types.
What about Google Analytics 4?
Google Analytics 4 relies on client-side processing for generating the event request. Thus server-side GTM doesn’t actually need to access any cookies for GA4 hits to work.
One notable exception is if you’ve configured your server-side GA4 Client to use the “Server Managed” identity setting, which enables the FPID cookie for GA4 hits.
You must revert this setting to “JavaScript Managed” if you want to do cross-domain tracking with your Shopify checkout properly. FPID relies on cookies read and written over the network, and due to Shopify’s sandbox restrictions, this is not possible on your checkout page.
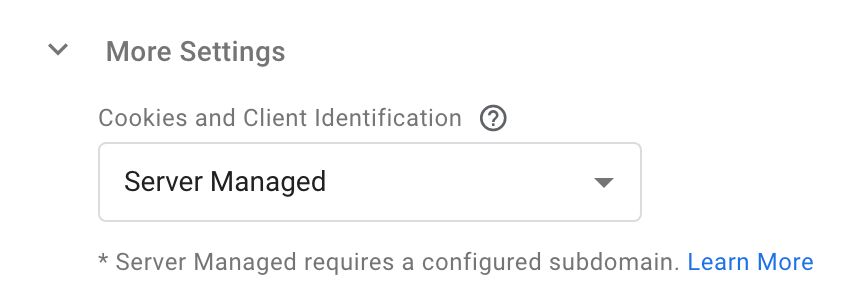
Make sure you switch this setting if you want cross-domain tracking to work properly.
In the examples of this article, we’ll be using Google Analytics 4 as the incoming data stream to server-side Google Tag Manager, where it will then trigger the Google Ads and Facebook CAPI tags, too.
Google Ads Conversion tracking
In this first section, you’ll learn how to “spoof” first-party cookie access in SGTM, where that access is denied due to Shopify sandbox restrictions.
The setup has many moving parts, mainly because the Google Ads Conversion tracking tag is a bit of a black box.
If you want to follow along, this guide assumes that you already have a Google Ads Conversion tracking tag running in SGTM, triggering on a conversion event generated by GA4.
Summary of actions
Here’s what you’re going to build.
When the user comes to your web page from an ad click, the URL has the gclid parameter. This parameter contains information about the ad click, and it’s a required part for Google Ads conversion tracking to work.
Google Tag writes this value into a first-party cookie, so that it’s available on your conversion pages, too.
Because SGTM running with Shopify’s sandbox can’t access this cookie, you need to manipulate your client-side tags to grab the cookie value and pass it as a custom parameter to server-side GTM.
In SGTM, you then need to construct a “fake” URL that includes this gclid value, so that the server-side tags “believe” there was a gclid in the URL.
This way, when your Google Ads Conversion tags fire in server-side GTM, they can utilize this value, even if the page URL didn’t have it.
Parse and transform the _gcl_aw cookie
In your web container, you’re going to need to make three changes:
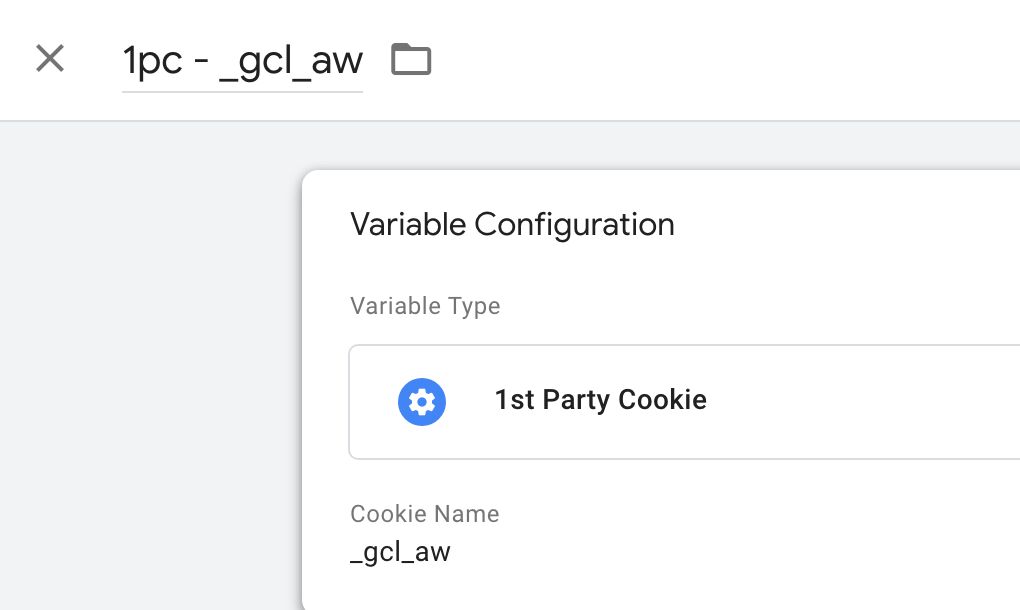
- Create a 1st Party Cookie variable for
_gcl_aw. - Create a Custom JavaScript variable to parse the
gclidvalue from the cookie. - Add the
gclidvalue as an event parameter to the conversion event tag(s).
Here’s what the 1st Party Cookie variable looks like:
The Custom JavaScript variable should have something like this:
function() {
  if (/[?&]gclid=/.test(document.location.href)) return;
  var cookie = {{1pc - _gcl_aw}};
  return cookie && cookie.split('.').pop();
}
The variable first checks if the page URL has the gclid parameter. If it doesn’t, it then checks if the _gcl_aw cookie exists. If the cookie does exist, it grabs the string after the last . symbol, which would be the gclid value.
To wrap up the client-side configuration, the value is added as an event parameter to the GA4 conversion event (which you use to trigger your Google Ads Conversions server-side):

I’m using a custom namespace (custom_) so that it’s easier to spot it in the server-side event data and prevent other tags from accessing it.
Configure the server-side setup
Right now, if the gclid is available in the _gcl_aw cookie, your client-side tag will send it to server-side GTM using the parameter custom_gclid.
Now you need to create a Transformation that makes the Google Ads Conversion tag believe the page URL has the gclid parameter, even if it actually didn’t have it. Here are the steps to take:
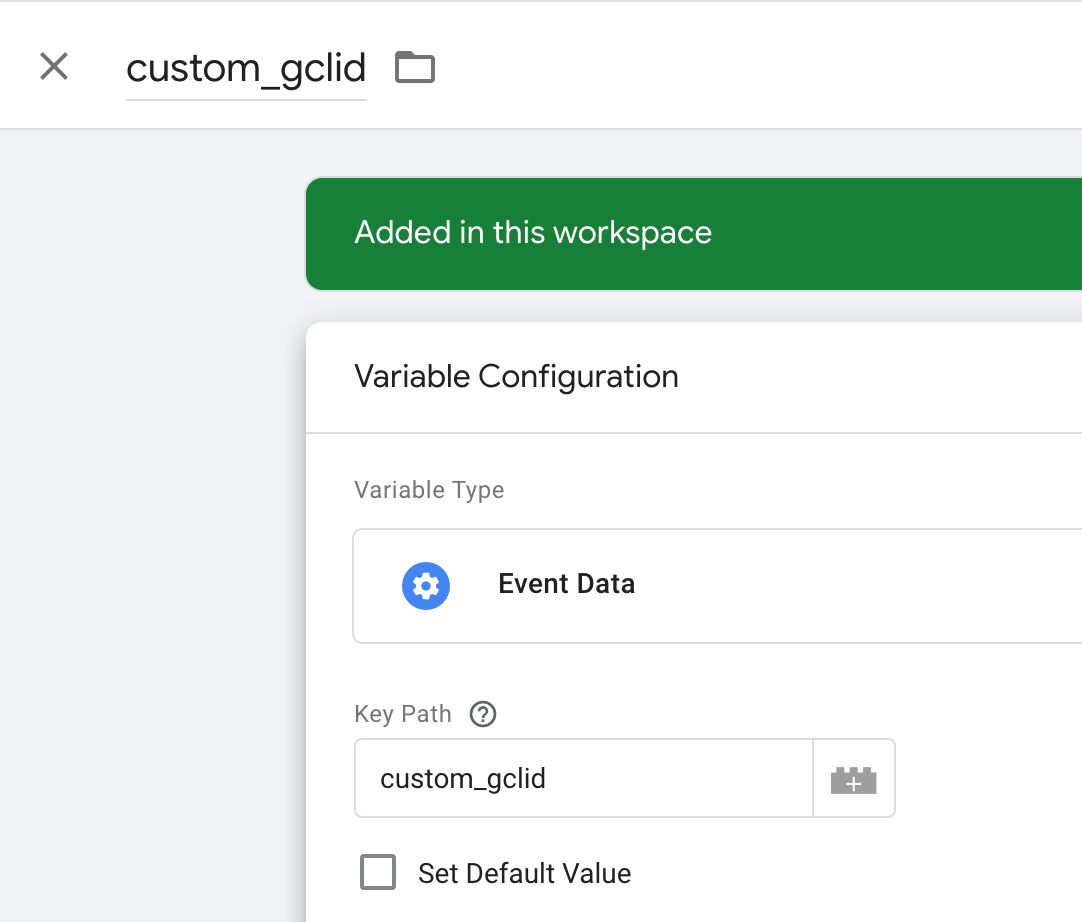
- Create a new event data variable for
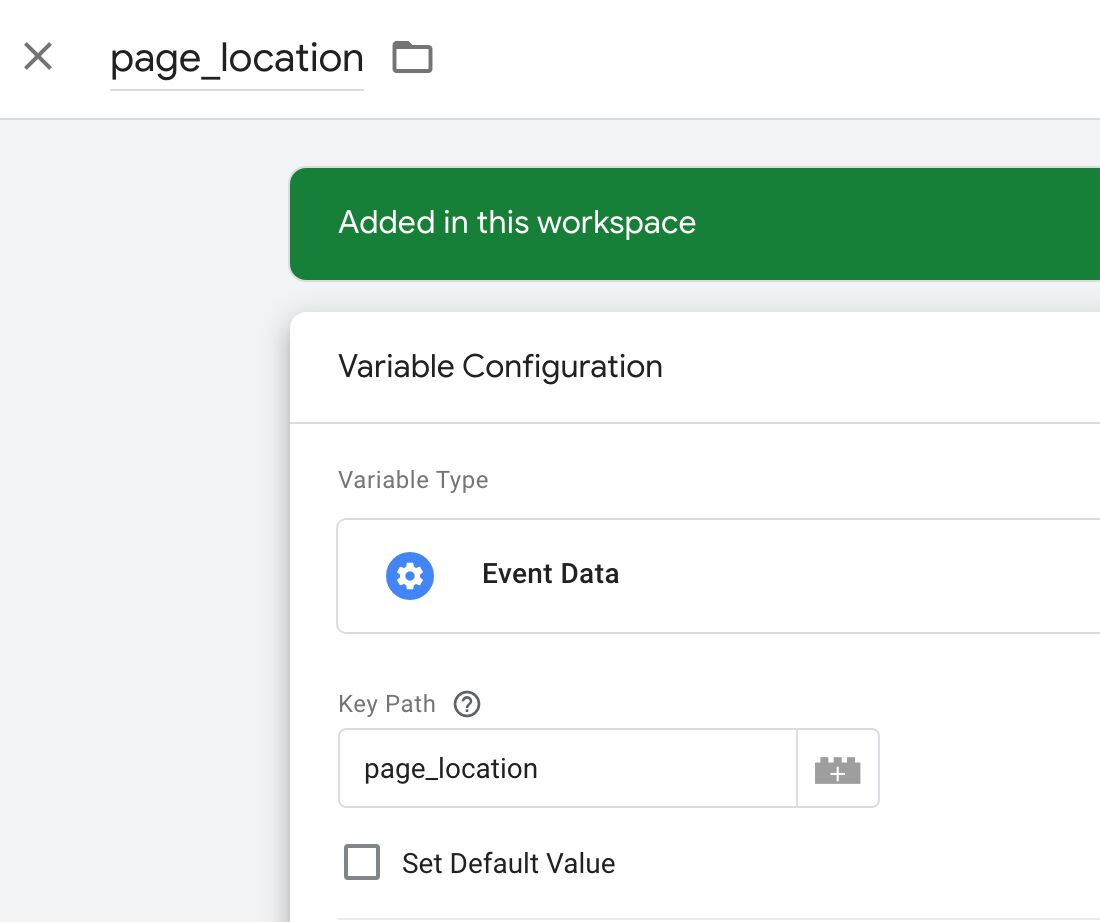
custom_gclid. - Create (or use) a new event data variable for
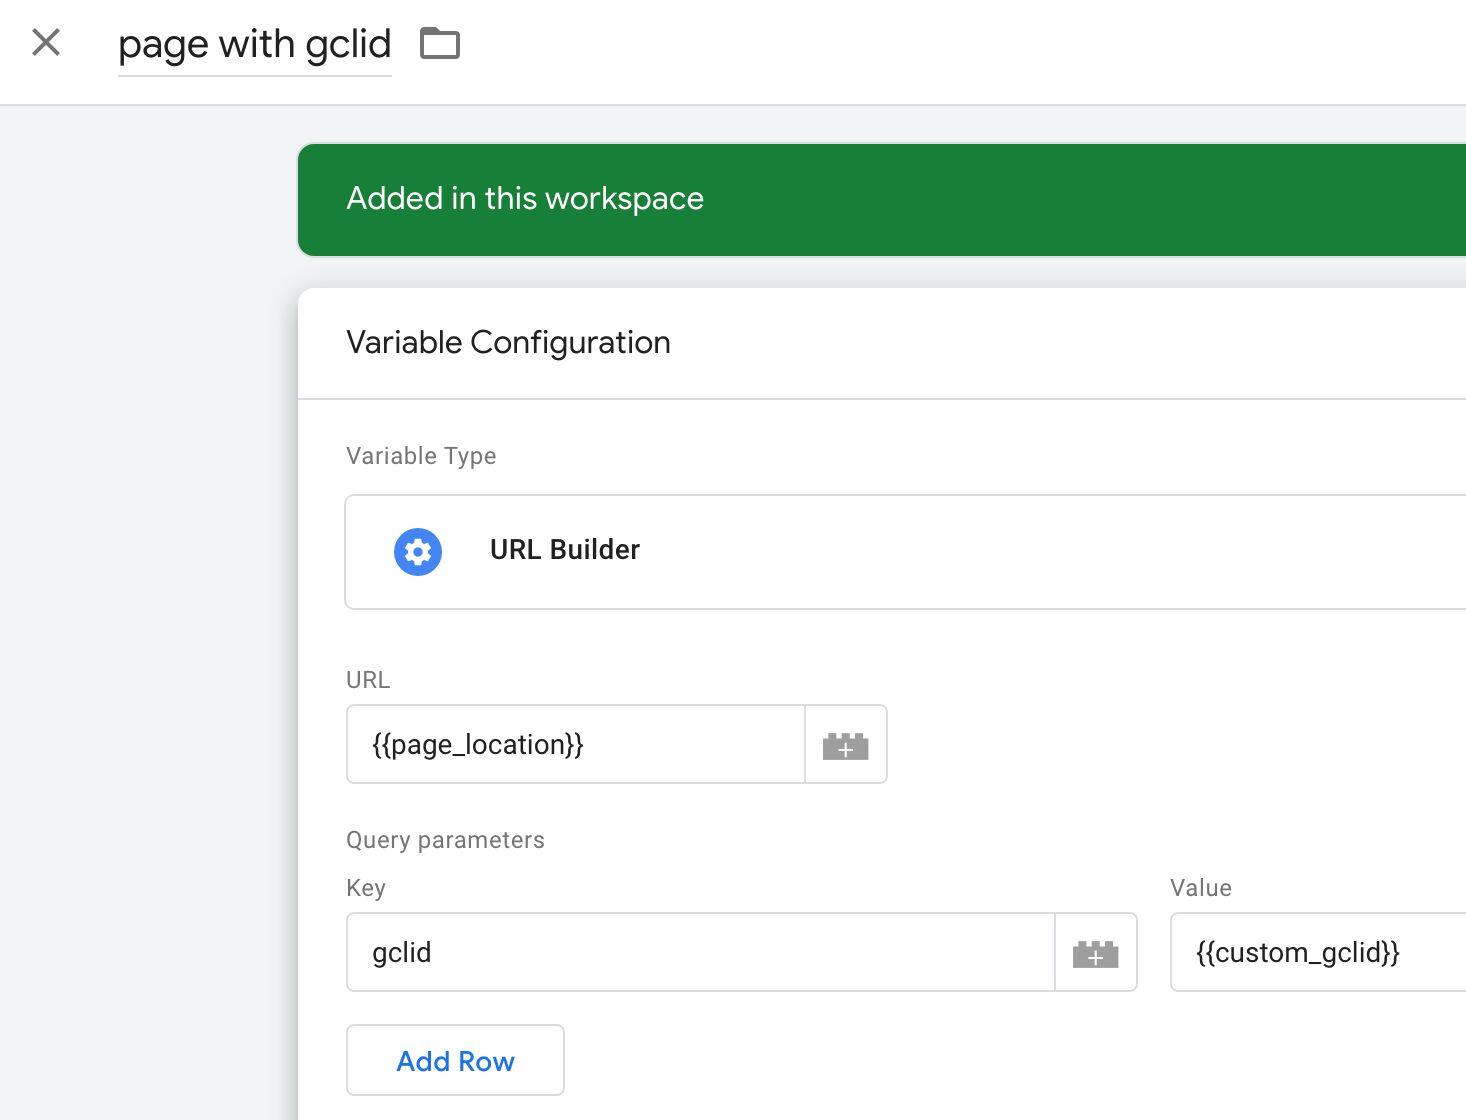
page_location. - Use Stape’s URL Builder template to construct a URL variable that appends the
custom_gclidvalue to thepage_locationURL as the&gclidURL parameter. - Create a Transformation that augments
page_locationwith this new URL string.
The event data variable for custom_gclid should look like this:
The event data variable for page_location should look like this:
Next, install the URL Builder variable template by Stape. This lets you construct a custom URL string in server-side Google Tag Manager.
Once the template is installed, create a new variable using that template. Configure the variable like this:
Finally, create a new Augment Event transformation that looks like this:
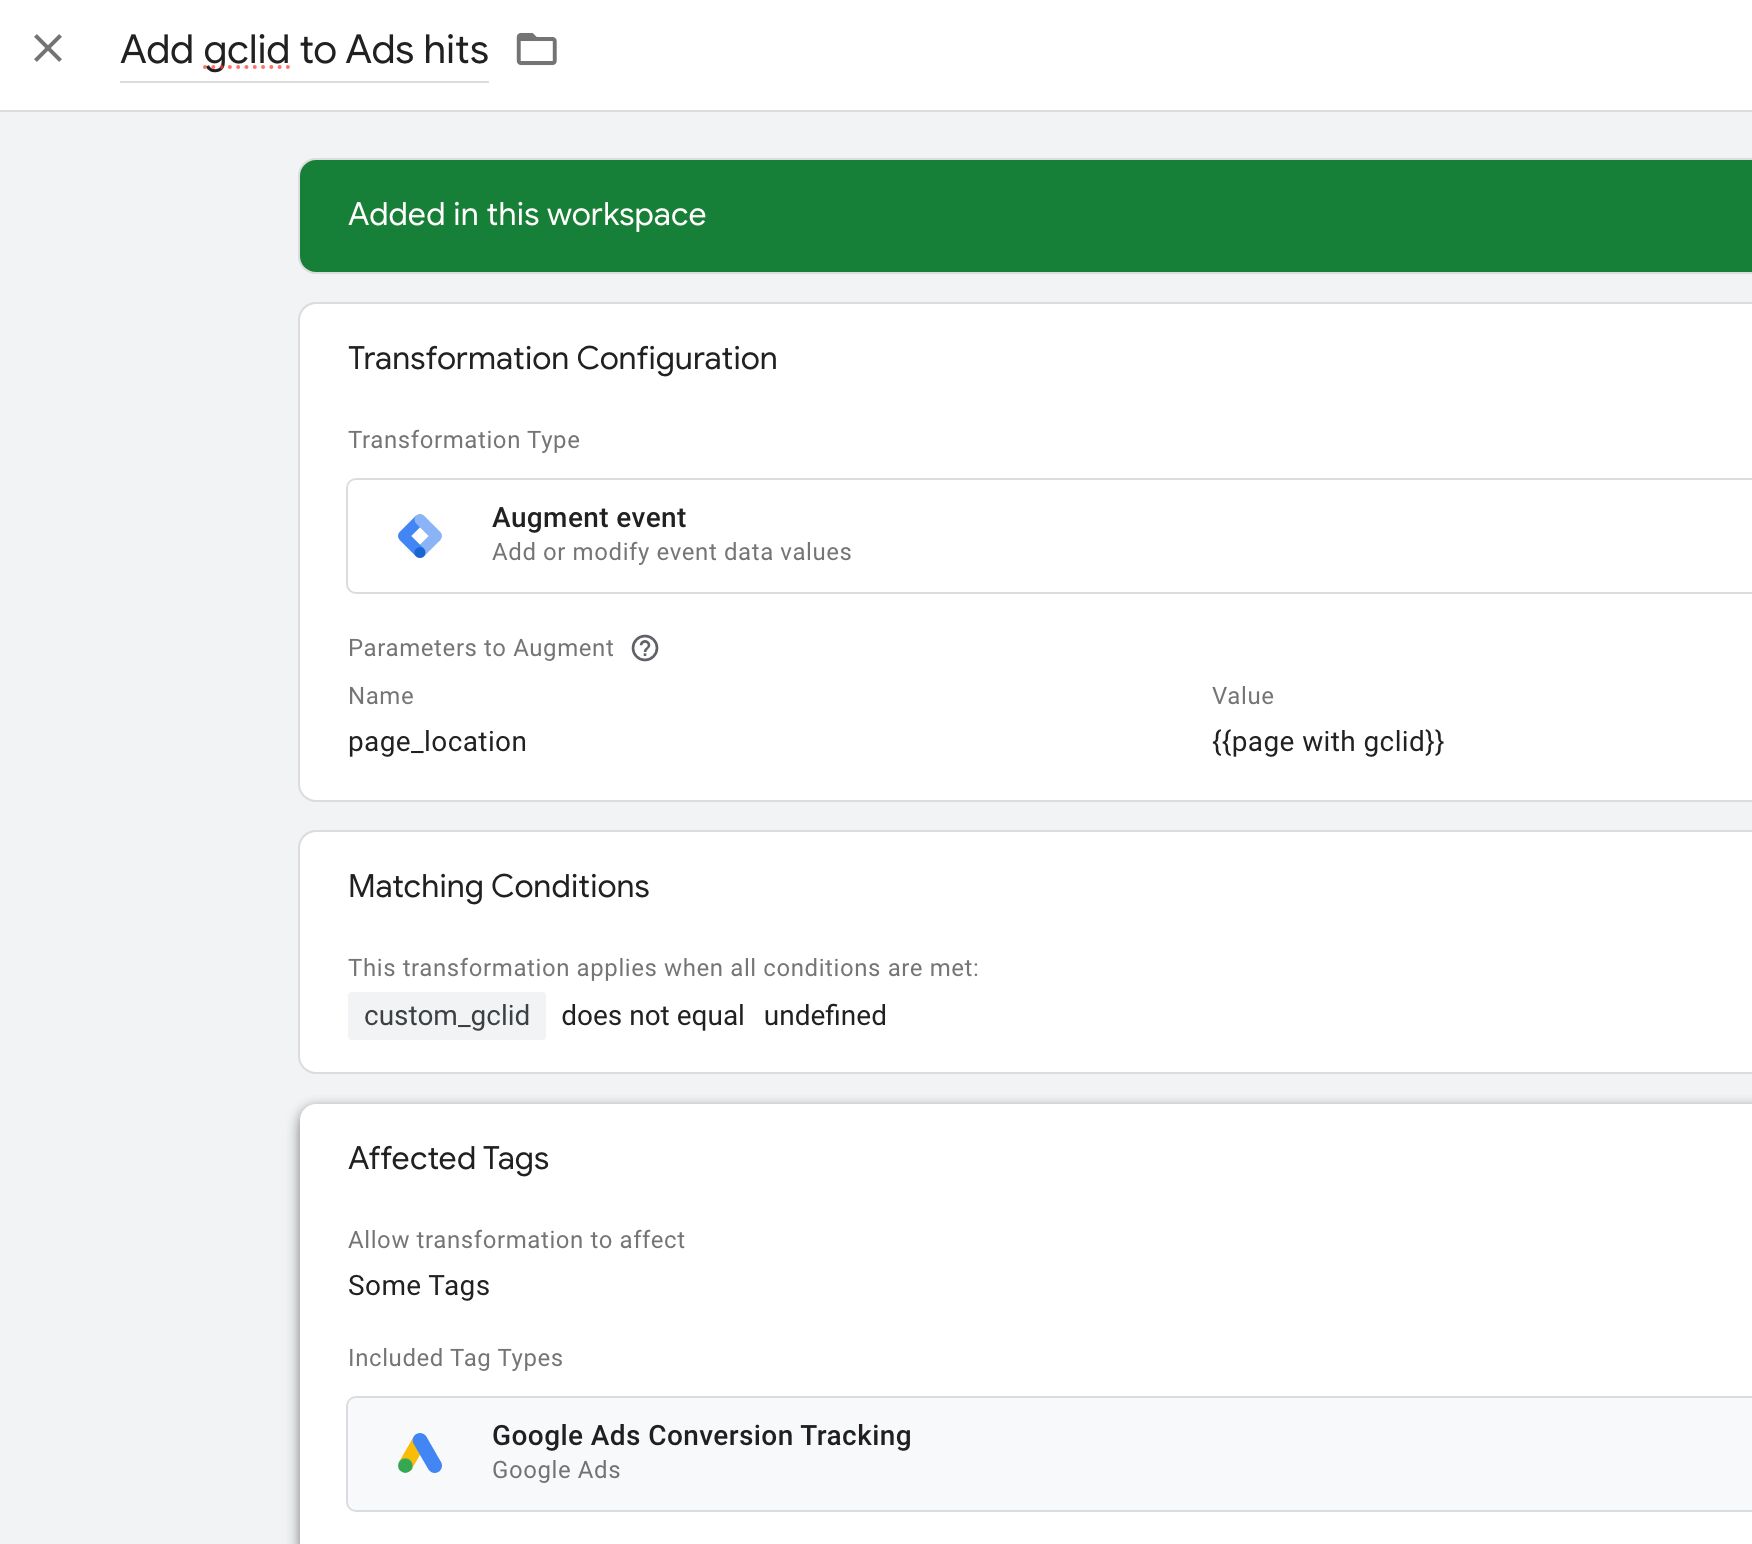
Make sure you set page_location to the value of the URL Builder variable that constructed the “fake” page URL with the gclid value grabbed from the event data.
It’s a good precaution to activate this transformation only when custom_gclid actually has a valid value.
It’s also sensible to apply this transformation only to your Google Ads Conversion tracking tags.
Test the setup
Once you have all these in place, you can test the setup.
- Browse to your website using a dummy
gclidvalue, such ashttps://www.simoahava.com/?gclid=just-testing-gclid. - Do whatever it takes to fire the conversion event.
- In server-side GTM, inspect the outgoing requests for the conversion event, and find the request generated by the Google Ads Conversion tag.
- You should see
&gclaw=just-testing-gclidamong the parameters of the request.
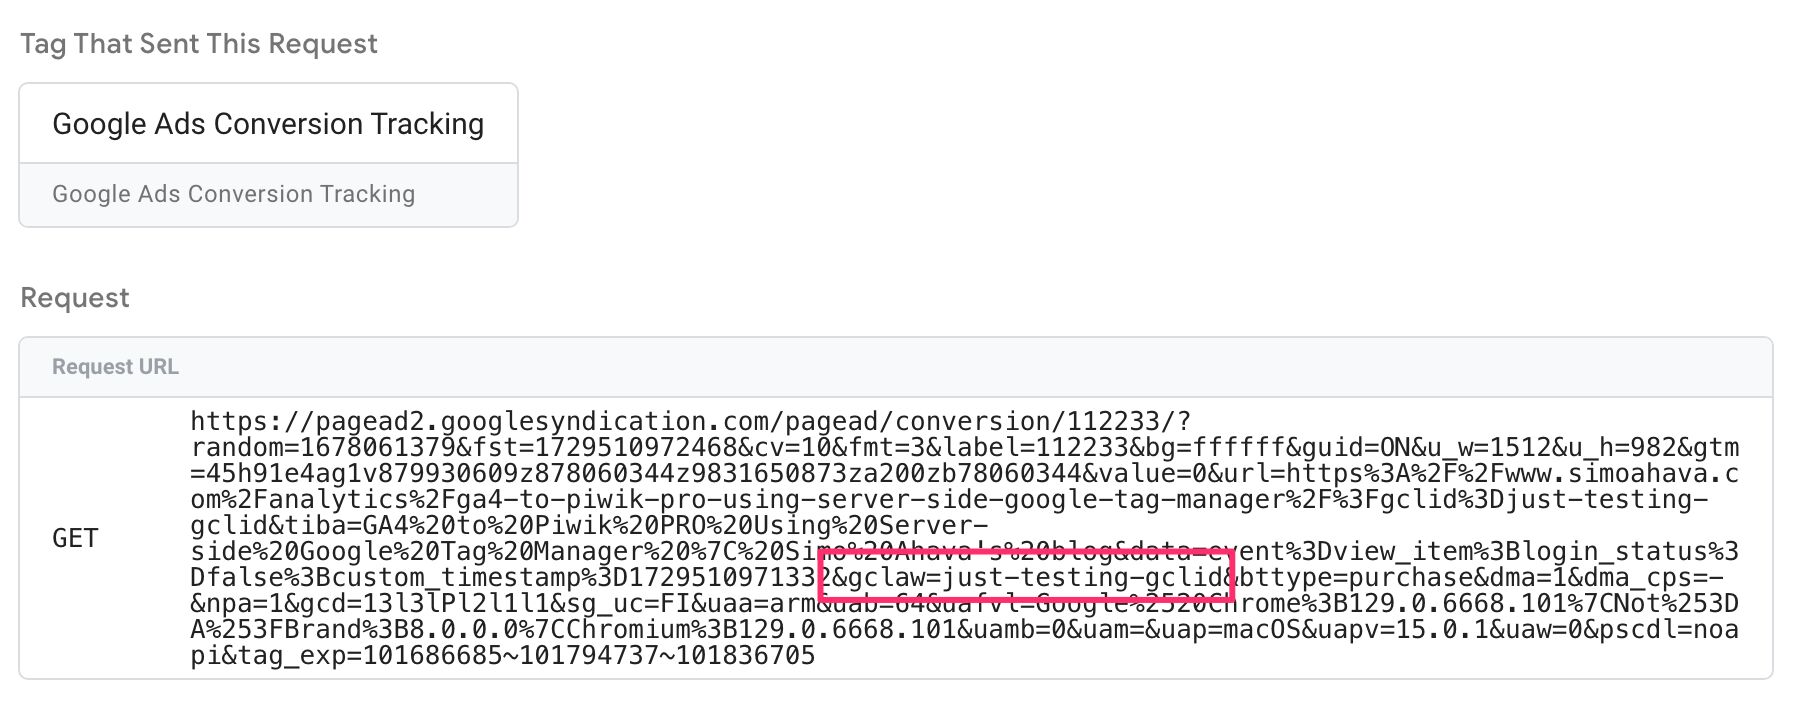
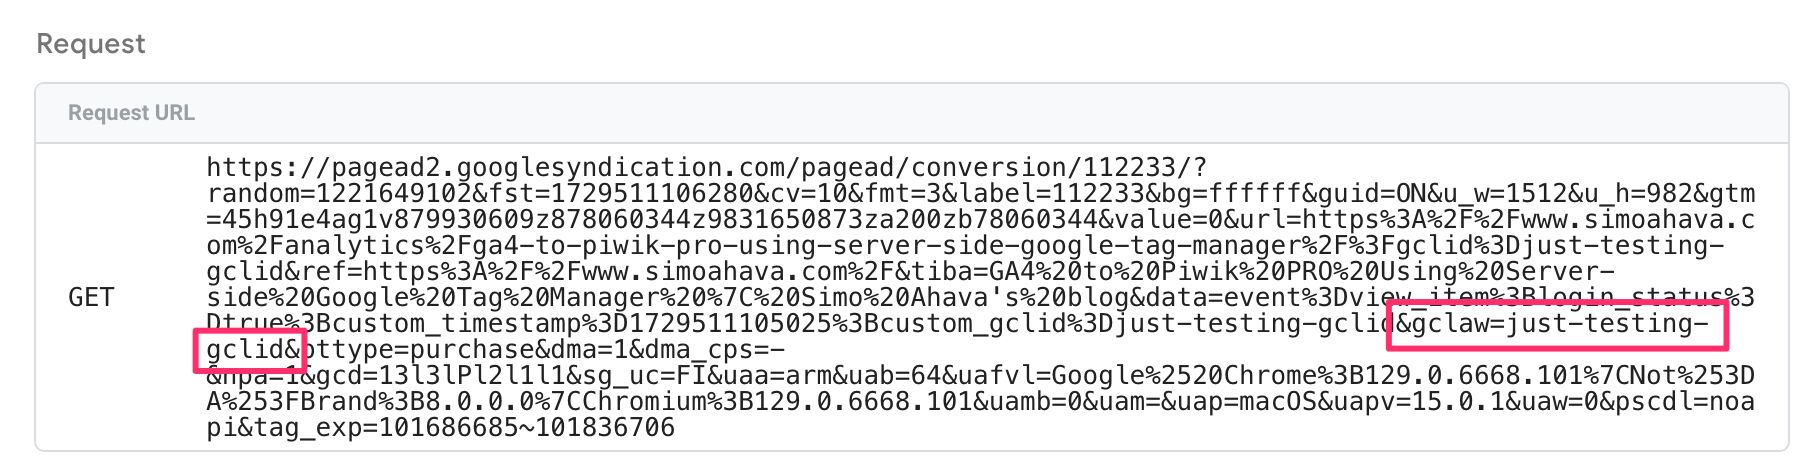
Now, repeat the steps above, except make sure the URL does NOT have gclid this time.
Again, you should see &gclaw=just-testing-gclid, because the Transformation “faked” the URL with the parsed cookie value in the client-side request.
Nice, you’ve got your conversion tracking up and running even while using Shopify’s sandbox!
Facebook Conversions API
The Facebook setup is much easier, because you don’t have to construct any fake URLs and you don’t have to parse the _fbc cookie value either.
This is thanks to Stape’s excellent Facebook Conversions API template, which I recommend to anyone working with Facebook’s CAPI in SGTM.
Summary of actions
Similar to Google Ads, when someone clicks your ad in Facebook, they land on your site with the fbclid value in the page URL.
This is then written into a first-party cookie by the Facebook pixel.
This setup assumes that you have Facebook pixel running on the page, too. If you don’t, then you need to use a custom client-side solution (such as a Custom HTML tag) to generate the
_fbccookie.
Because SGTM can’t read this cookie, you need to grab the _fbc cookie value and attach it to your GA4 conversion tags as a custom parameter.
In SGTM, you’ll then grab this value from the event parameters and attach it to the Facebook Conversions API tag. You can (and should) use a Transformation to remove it from other tag types.
Parse and send the _fbc cookie value as an event parameter
In your web container, you’ll need to do the following:
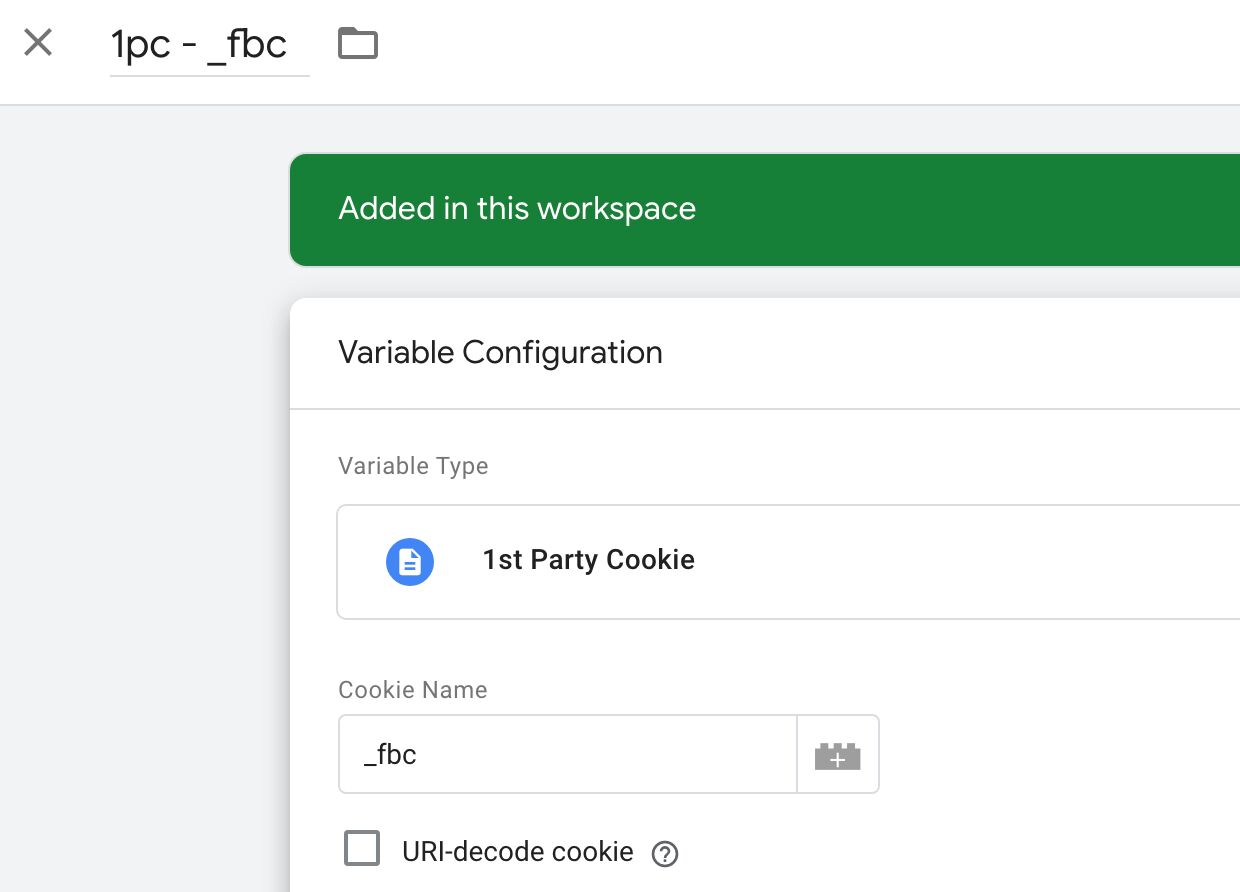
- Create a 1st Party Cookie variable for the
_fbccookie. - Add it to your GA4 conversion event tag as an event parameter.
Here’s what the 1st Party Cookie variable looks like:
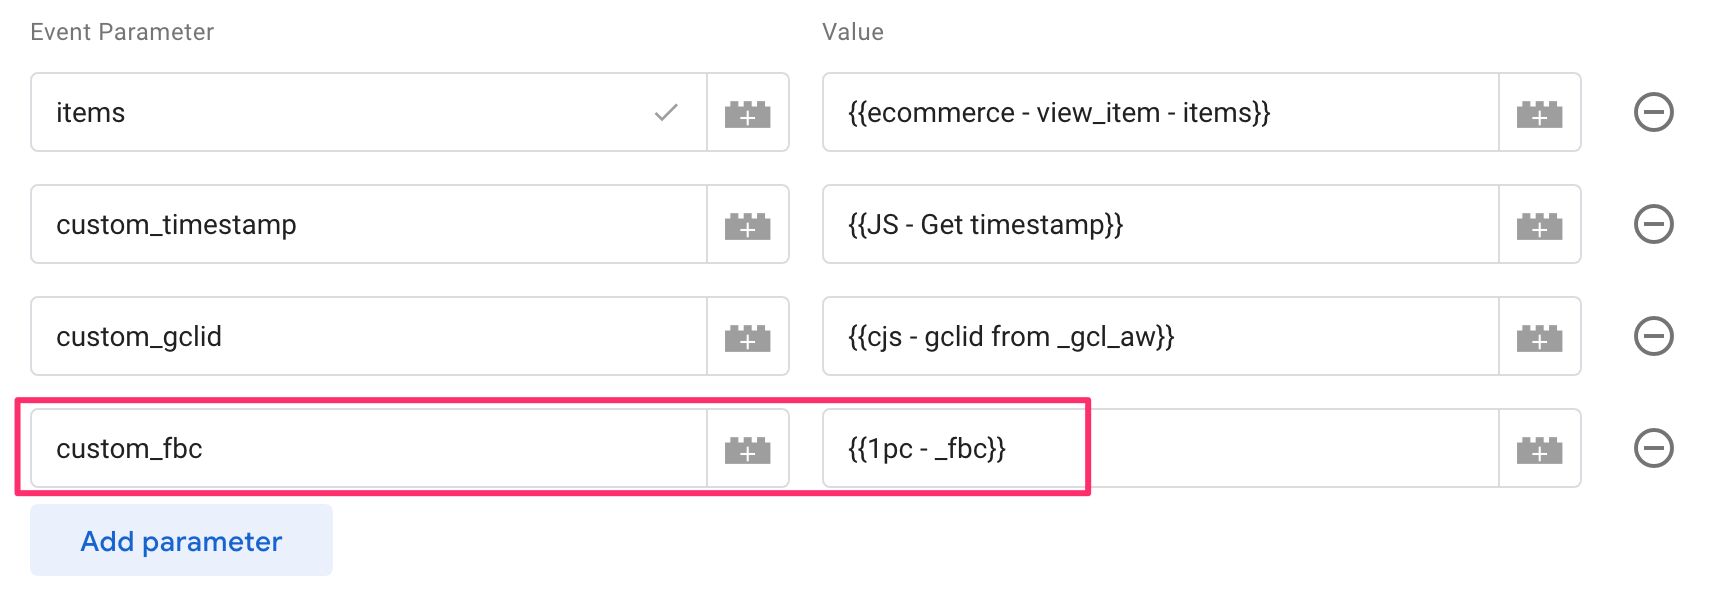
All you need to do next is add it as a custom parameter to your GA4 conversion tags (the ones that fire the Facebook Conversions API tag in SGTM):
Send the value to Facebook
In server-side Google Tag Manager, you’ll need to do these things:
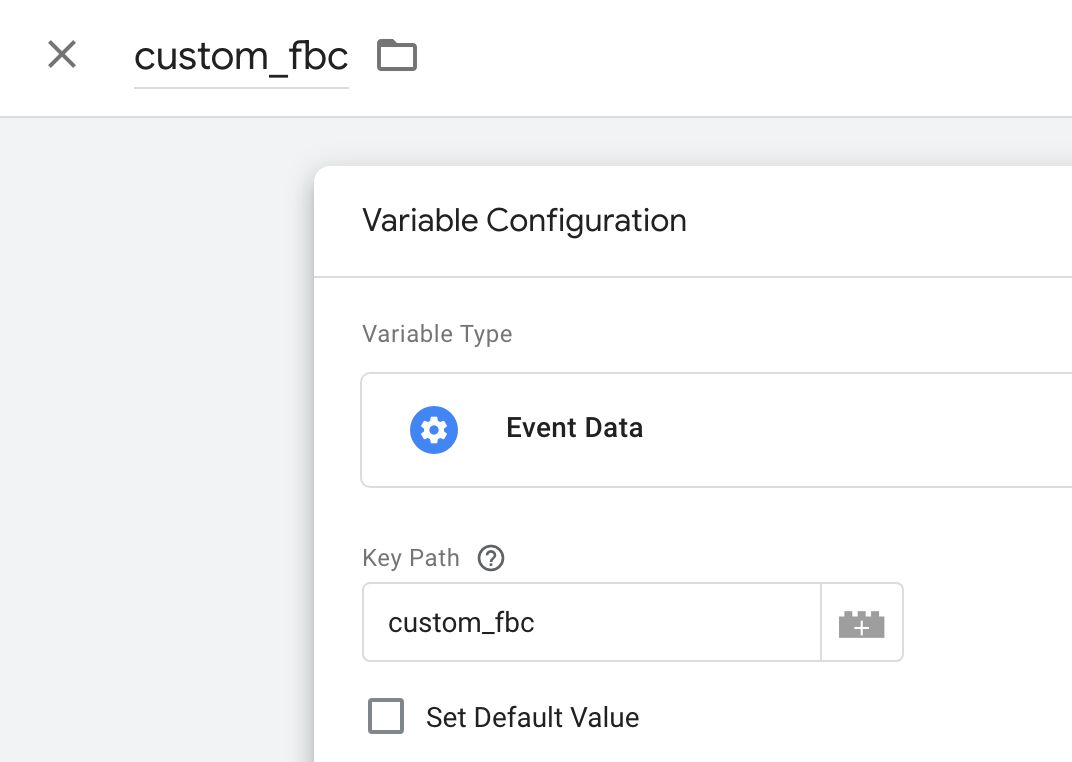
- Create a new event data variable for
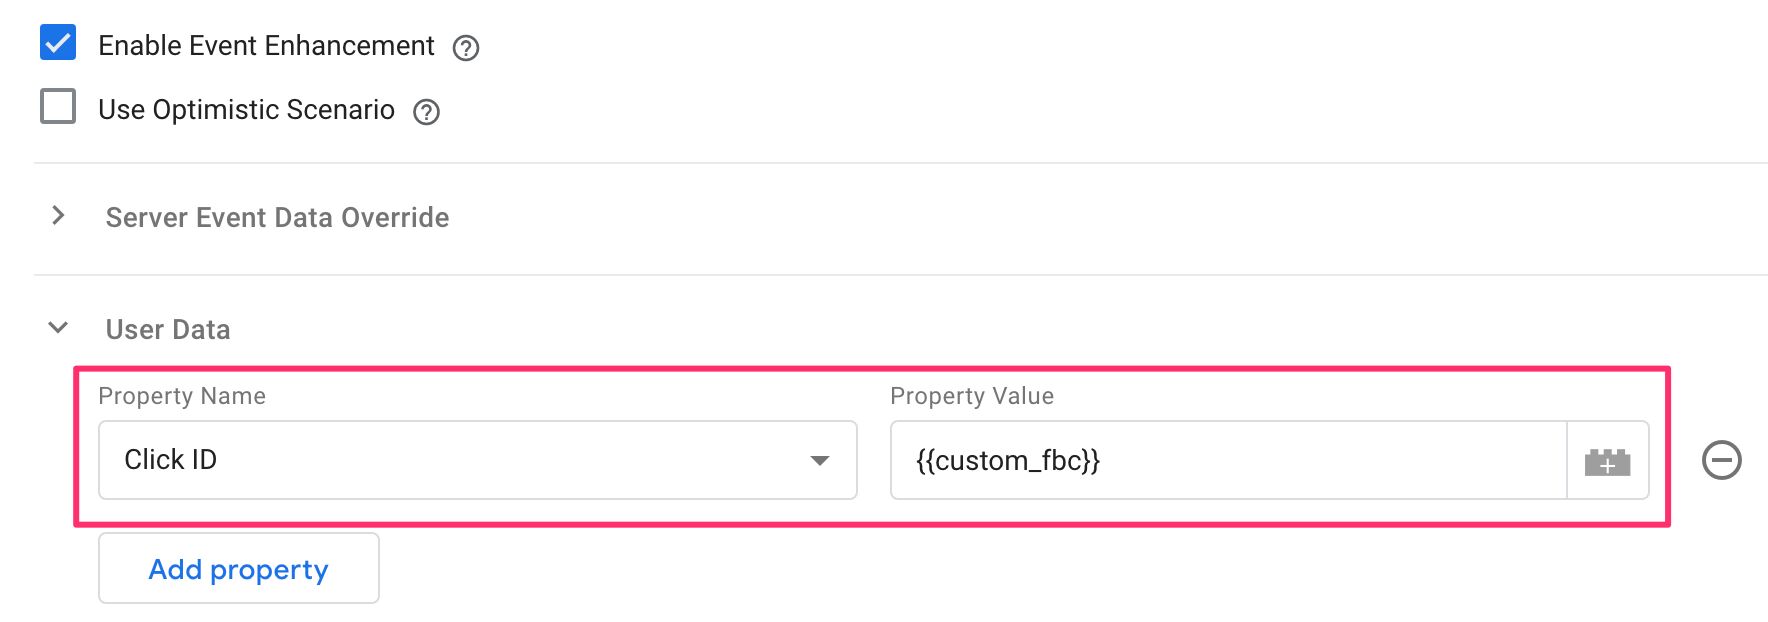
custom_fbc. - Edit your Facebook Conversions API tags to include this value as the Click ID.
- Create a new Transformation to exclude this parameter from your other tags.
Here’s what the event data variable looks like:
Here’s how you add it to Stape’s Facebook Conversions API tag:
And finally, here’s what an Exclude Parameters Transformation looks like, where you remove the parameter from other tag types:
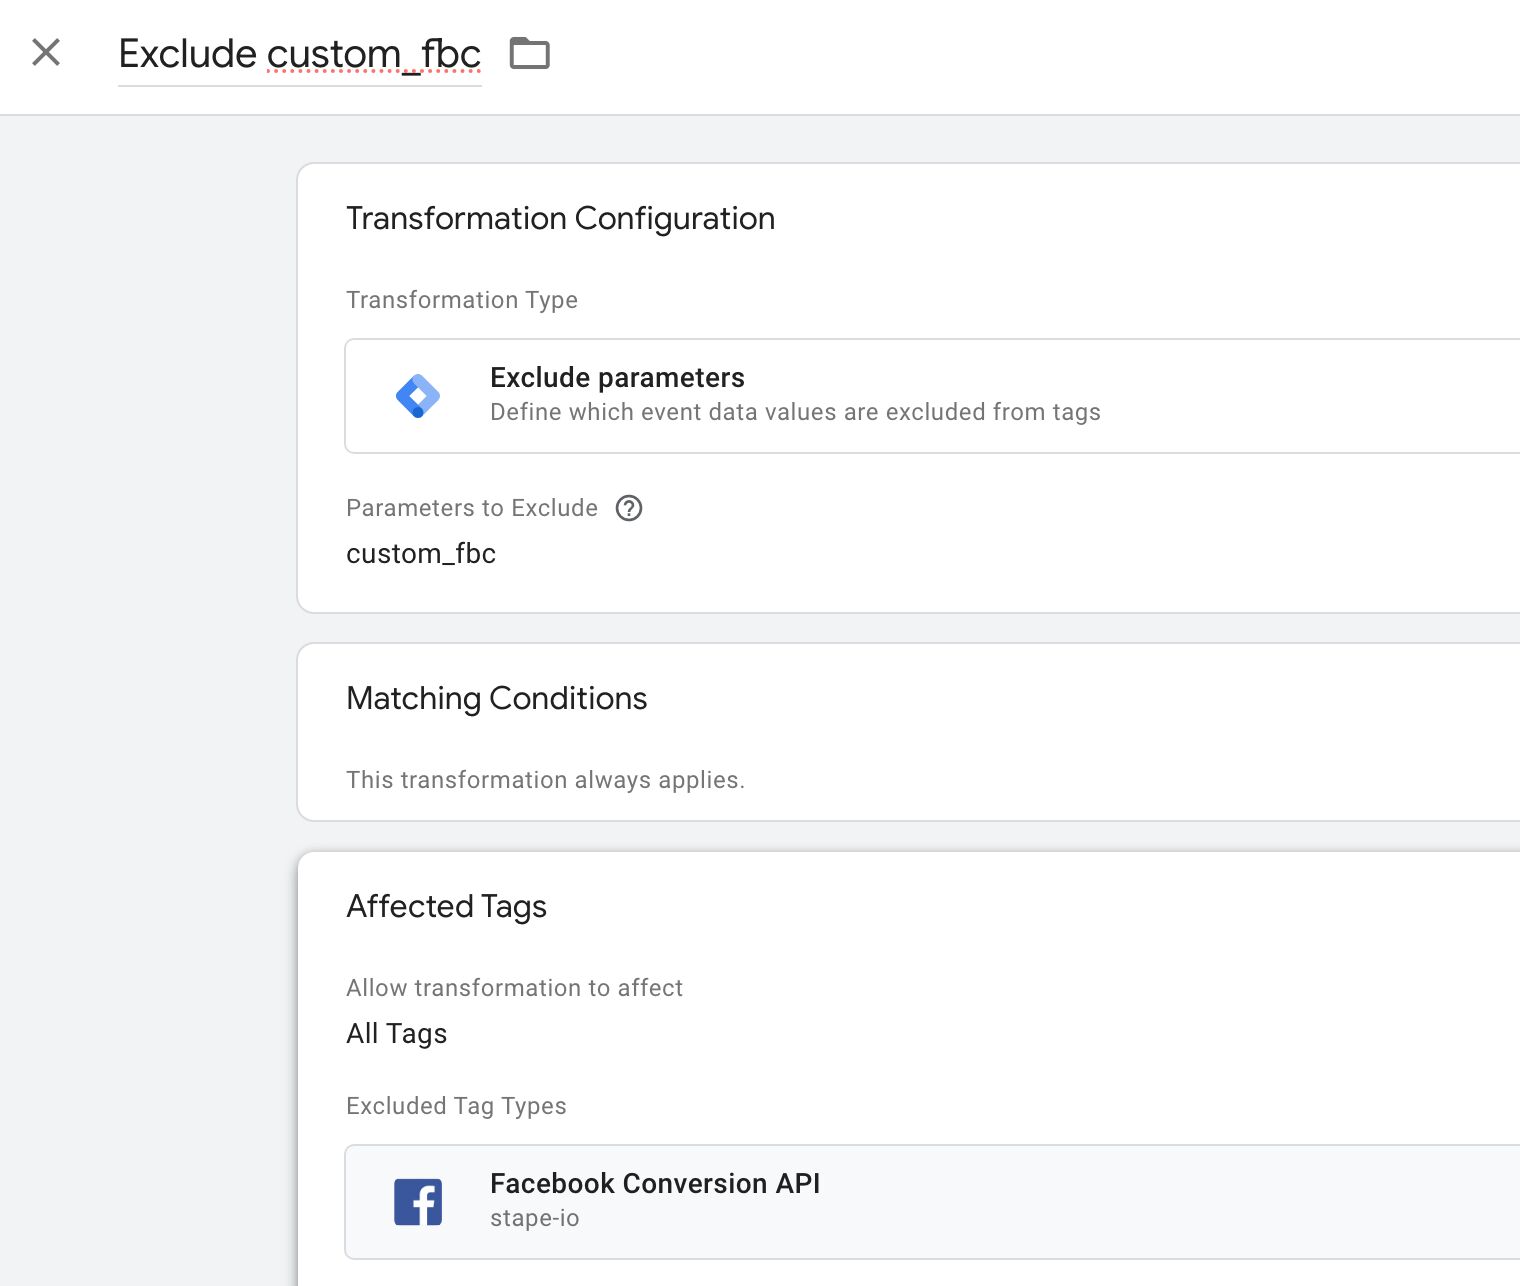
This makes sure that only the Facebook Conversions API tag type can “see” the event parameter.
Test the setup
Now visit your site with a custom fbclid value in the URL, for example https://www.simoahava.com/?fbclid=just-testing-fbclid.
In SGTM, you can then select the conversion event and open the Console tab in Preview mode. Stape’s template has an extensive log trace, and you should find your custom Click ID in the outgoing request:

Next, visit the URL again **but without fbclid as a parameter.
You should still see fbc in the outgoing Facebook request server-side, with the correct value sourced from the event data object:

Summary
This is a convoluted approach to a sticky problem.
Shopify has improved its security parameters quite a bit with Checkout Extensibility. The sandbox they’ve introduced makes it difficult to do any custom setups, and Shopify probably wants to funnel users towards dedicated apps for advertising measurement, for example.
However, as I’ve always said, the power of server-side Google Tag Manager is in control. By routing your traffic through SGTM, you can assume full control over the data streams that flow through it.
For this reason, I don’t consider this article a workaround in the “black hat” sense. It’s more a way to work with Shopify’s restrictions without compromising the control that server-side Google Tag Manager grants you.
Mind you, this approach is useful for any scenario where the server is not in a same-site context with the website sending requests to it. By accessing cookies client-side and leveraging request parameters, you can “fake” server-side cookie reads.
The one thing you can’t do, though, is write cookies in the server response. There’s no way to fake that.
Let me know in the comments if this approach raised any questions! I’m sure readers would also appreciate other approaches you have in mind for getting server-side GTM to work with Shopify’s checkout.